Help Page for assembling frames and general Q & A
Ordering notes
Frames may be ordered as –
1) Frame only
2) Frame, acrylic and backboard
3) Frame and backboard only
4) Frame, acrylic, backboard and matboard
Frame assembly notes
General instructions suitable for all our frames
Cross Bracing Frames
Cross bracing is recommended for large frames to prevent possible sagging and as an added safety measure. When crossbracing is suggested additional fittings will be provided.
Why do you use acrylic instead of glass?
We use acrylic instead of glass and foamboard instead of MDF (except when MDF is more suited for some applications). Most framers offer acrylic and foamboard for an additional cost, but we supply them as standard.
About Mat Boards, and how to hinge
We hand cut all our matboards and only offer single window mats to keep it simple and streamline our production. A mat will draw your eye to the art and make it stand out and our frames compliment the work with a simple attractive border.
Frame styles
We only sell aluminium frames. They are strong, elegant and importantly very easy to put together. We only offer one style by defaut but some premium profiles are also available for special orders.
Downloads –
Frame assembly notes (PDF)
Frame assembly notes
^ Assembling:
1. Lay out the fitting to check that you have all the required parts
2. Note each frame should have x 4 corner joiners plus two hanging slides
3. If a complete kit it will additionally have acrylic and backing board, hanging wire and packing strips and an optional bevel cut 4 ply window mat board.
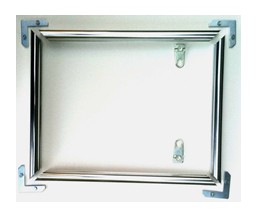
4. The components will look like something like the below illustration frame and hardware may vary dependent upon the frame selected.
Image 1 – frame, 4 x corners and 2 x Eurohangers
5. With a small screwdriver make up a U shape leaving the top off. ( the artwork sandwich must be slid into the frame slot before you fit the top. Screws may be phillips head or slotted depending on the type of frame hardware.
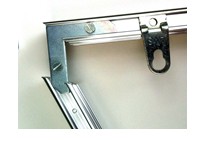
6. Rememberer to slide in the Eurohangers into the vertical arms of the frame. They can be adjusted later, but if you don’t put them in you will forget to and will need to undo the frame again later. Place them about one third of the way down.
7a. If you are using a bevel cut window mat, you can hinge your artwork to the back of the matboard (see video) or alternatively attach it to the foamboard backboard also using a ‘T’ hinge (see 7b below). Position the artwork under the window so you have a small overlap all round. You will need to position it so you can attach the supplied acid free tape just on the top, so the art hangs down.
7b. An alternative method of mounting your art is to place it face up on the supplied foamboard backboard and position the mat board over it in position. Place a safe (non damaging) weight on the art to hold it in position then remove the mat. Slip two pieces of the supplied acid free tape under the top of the mat on either side so the sticky side is facing up. Tape the exposed tab to the foamboard making a T. Make sure any exposed remaining sticky tape is covered.
8. Finally take the acrylic and remove one side of the protective film and place this perfectly clean side onto the matt and then place this over the backing foamboard and lastly remove the front sticky layer off the acrylic. Keep the acrylic perfectly clean but if it does need to be wiped use a static free cloth.
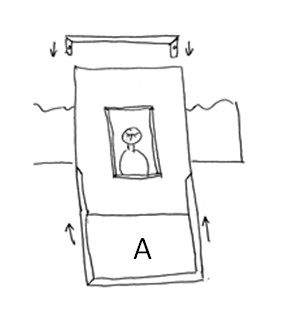
9. Slide this artwork sandwich into the extruded slot of the frame (A) making sure that you have the hangers at the top then pop on the top bar and screw in up tight. This is made easier if you hand the artwork over the edge of a table top as shown.
10. If there is any rattle in the frame then jam in the supplied packers until it is wedged tight and will not move about, and then attach the wire leaving about 20 mm of slack as in the image below. Try not to handle the acrylic front and to keep the finger marks to a minimum.

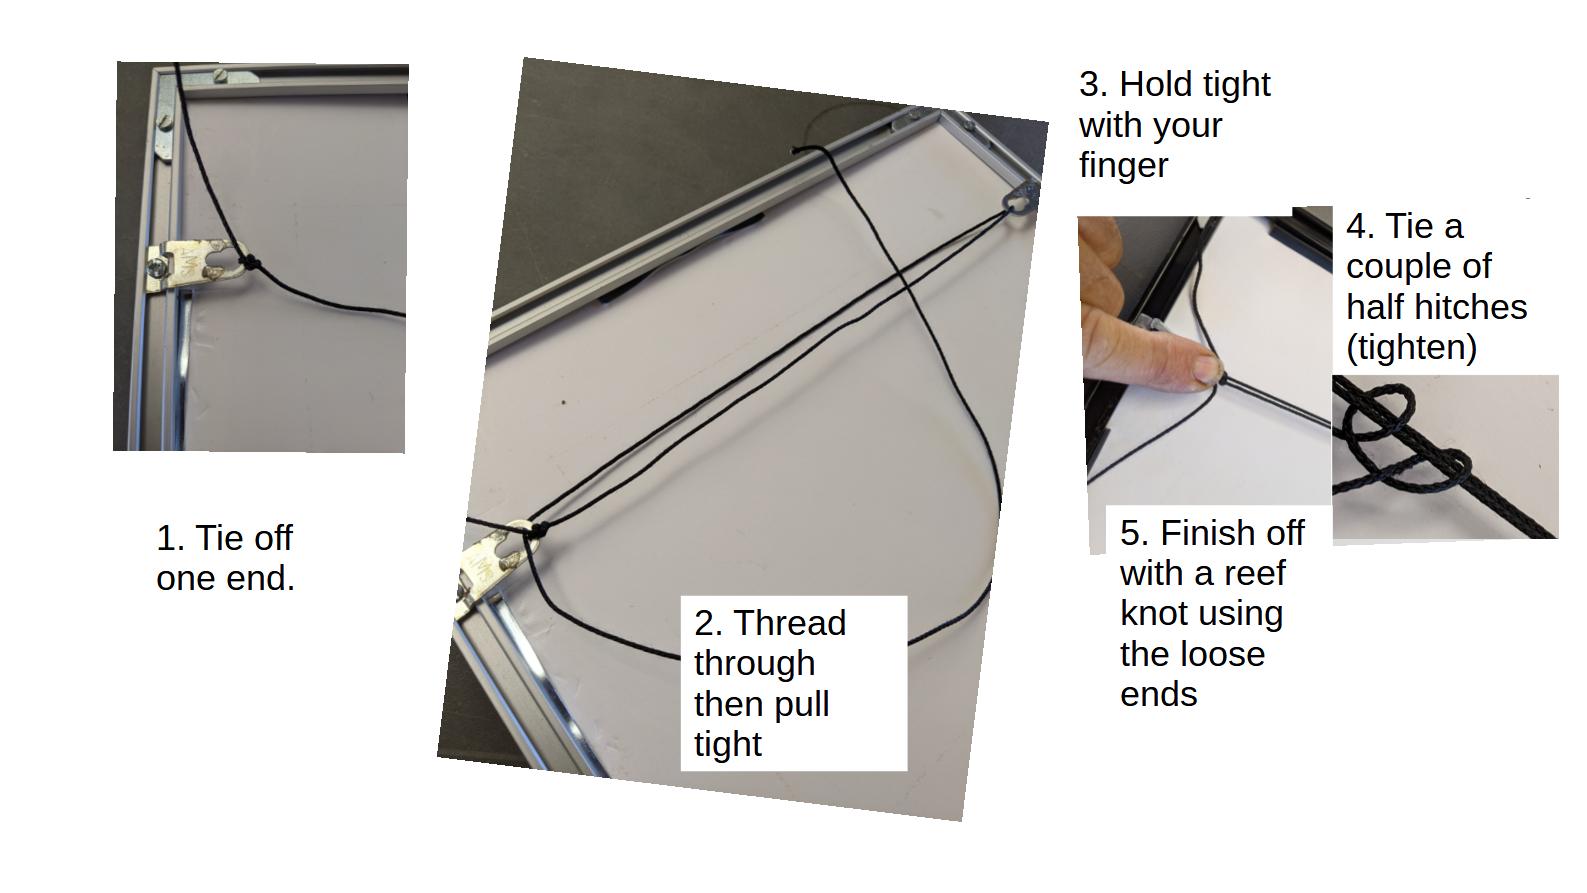
11a. Easy cord tying
A very easy method that produces a good result is to tie off one end then feed the cord down through the opposite side hanger then up through the start side. Pull it tight, then put your finger on it and tie the end off with a couple of half hitches. Finish it off with a reef knot using the starting end then trim.
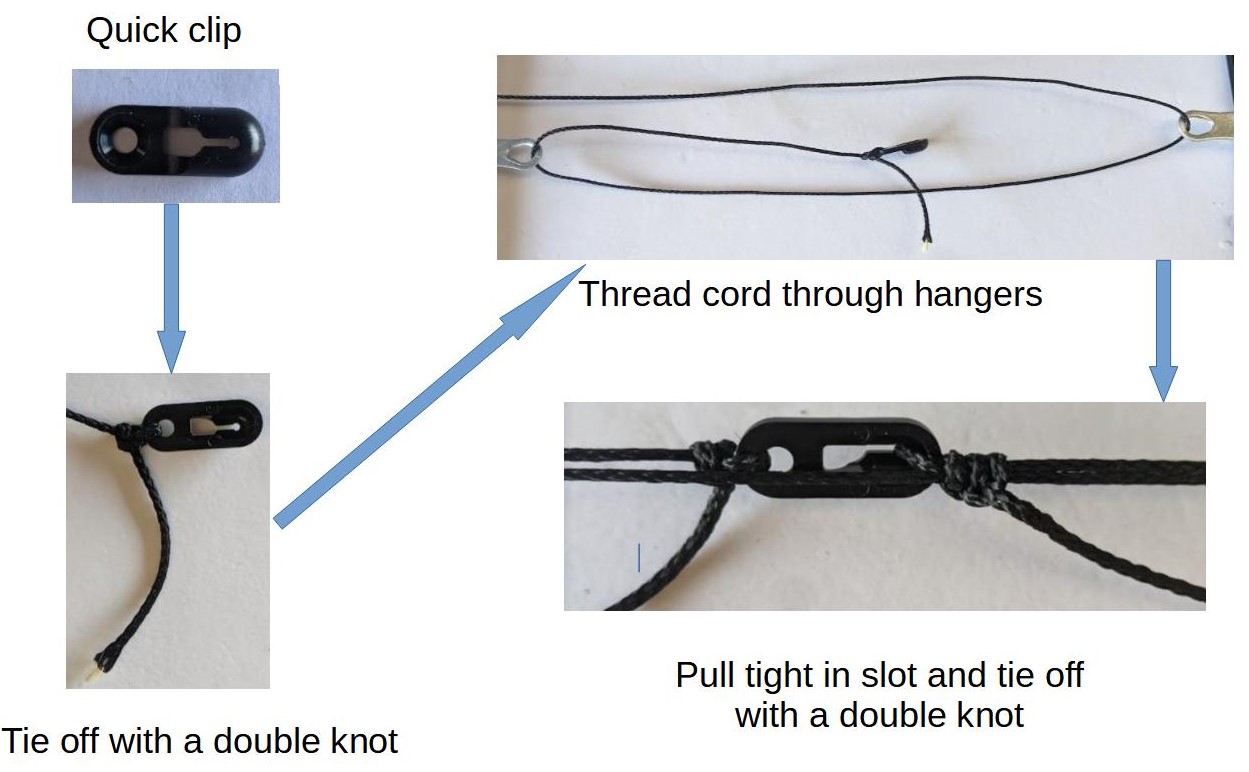
11b. Quick clip cord tying
We are always trying to make like easier. I bought some ‘Quick tie Clips’ from the USA and they are good for small/medium sized frames. Just tie off one end with a double knot then tread through the hangers. Pull tight and tie off with a double knot. Make sure you tie them off well.
12. Finished!! I hope this helps a little, but if you do have any questions, please just contact us.
Cross bracing
^ Bracing:
Aluminium frames are very strong. Much stronger than wood of a similar profile. Very large frames however can sag sometimes, so when frames are over one metre in diameter it is best to cross- brace them with wire.
This prevents them sagging and also prevents the possibility of a corners slipping (rare but can happen with additional weight). We often supply large frames with MDF backboards (rather than foamboard) as it is more rigid so they can be quite a lot heavier than frames under a metre wide.
X bracing is simple, we just supply extra hangers and wire that takes a minute or two to put in place and it gives you (and me) peace of mind.

Why we use acrylic
^ Acrylic:
Because we are an online only store, glass is just too difficult to post without damage so we only use acrylic which has many advantages. All of us walked past Travel Stores and wondered about the washed out Posters in the window that are mostly ghost images of what they had been and now exist as pale blues where the sun has bleached out the pigment of the printer’s inks, no more reds or yellows. The culprit of this damage is the suns powerful bleaching UV rays. These UV rays abound in our houses as well and can destroy and or or yellow valuable family memorabilia, photographs and art work. Our kits come complete with quality 100 % acrylic glazing that unlike glass filters out 99 % of these UV rays. And whilst we do not recommend that anyone would place valuable artworks in direct sun light our frames offer this built in protection. at no extra cost to you Other advantages over glass are that it is 100 % water clear and not green tinged to change the colour reference of your artwork , is not brittle and will not crack on house moves or falls from the wall and is just half the weight of glass. (less weight means less chance of detaching off the wall attachment hooks in your home or office).
So why don’t all framers use acrylic? The main reason is it is more expensive than glass and it is harder to cut. It also does attract more static which in turn can attract dust. Wiping with a non static cloth fixes this and we also have special acrylic cleaner available that is economical to use and does a brilliant job.
For more information on the benefits of acrylic, see this very informative article from the Picture Framing Magazine (05/2015). PFM_0515
Mat Boards
^ Mats:
A window mat is the customary mount for artworks, posters and photos. A mat is composed of a top sheet with a window. The window permits the art to be ‘set off’ to best advantage, provides protection for the art edges, and allows a small space between the art and the perspex (or glass). The backboard protects it from handling and isolates it from surrounding materials.
Because most of our aluminium frames are not deep (8-9mm) it is up to you whether you want to hinge the window and backboard as they should be held well within the frame. The advantage though is it does keep the window and backboard together if there is any movement or if you change frames.
Historically, museum-quality mats for works of art were expected to be made of rag fibers, that is, cotton or linen. Today ragboard is still favored by museums, but it is very expensive and some lignin-free, wood-derived boards are now often used. Mat boards of either type are usually buffered with an alkaline material to neutralize any acids they may absorb as they age. We only use acid free mats and backboards that typically come from the U.S.A.
Four-ply board is the thickness most often used for matting. Boards heavier than four-ply are available from conservation suppliers, but we don’t carry them. At justframekits we take a pride in our work, but we are not conservation framers. We produce the best frame kits we can, for the best price we can, using high quality materials.
HINGING
Hinging is the customary way to mount an object in a window mat. The artwork is hinged, with acid free paper. Conservation framers usually use Japanese paper and starch paste, but it is painful to apply. We use (and supply with orders) an acid free German made self adhesive tape.
In conservation framing the artwork is usually hinged to a separate (back) mat board. We do not supply a back matboard, because it would significantly increase your cost but we are happy to quote if you want one. Our (supplied) backboards are made of clay coated foamboard and are acid free, and you can attach to them if you want to. The reason the ‘hinged sandwich’ is used for conservation framing is because they are often very valuable works. Most of our customers just hinge from the mat itself. It is up to you which method you choose. By hinging to the backboard, it keeps your art stationary when a mat is opened and could prevent damage by hooking it in the window. It also means the back of your art is not exposed or laid directly on your work surface.
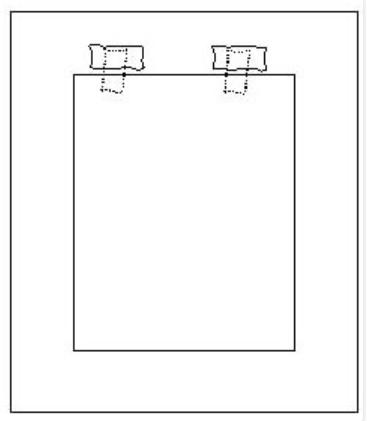
Whichever method you use, the most common method for attaching your art is the T hinge. As shown in the Figure below part of the hinge is attached to the object and part to the matboard or backboard. Hinges allow the artwork to be removed easily from the board if that becomes necessary. Just hinging from the top allows the artwork to hang, without chancing wrinkles.
Framing Diamond Paintings
^ Diamond paintings:
We are regularly asked to make frames for Diamond paintings, and there are a few different option’s to consider. Please advise us if you are framing a diamond painting so we can supply the most suitable fittings with your framekit. Please also see the measuring hints at the bottom of these notes.
For genuine DIAMOND DOTZ® we recommend Aussie trend handicrafts at Shell Harbour, NSW.
Framing options
There are several methods of using Justframekits for Diamond paintings.
1) Frame and backboard only. This is popular and cost effective as it involves just purchasing a frame and backboard. The natural sparkle is retained. Most customers just cut a square ot of the corners and fold the edges over the MDF. The edges can then be taped to prevent slippage. Springs are supplied to hold the backboard and painting firmly in the frame.
2) Frame, backboard and acrylic. For long term preservation we recommend including acrylic. The painting is held between the backboard and the acrylic making an airtight seal. It is easy to clean and will preserve your painting in place for years.
3) Many customers also like to add a matboard to set off their paintng. This is a great option. It is essential though if including a mat board to include acrylic to protect the mat, from dust, curling and absorbing moisture.
Measuring up
There are hundreds of diamond painting designs. The measurements provided on boxes are often not accurate so it is important to measure the actual painting.
The frame will overlap by about 4mm all round. It is up to you how you measure but most people measure the design size and accept a little frame overlap. You can either trim the painting, or fold it over the backboard. For regular framing (such as photos or prints) we provide foam backboards, but for Diamond paintings we supply MDF as it is stiffer and provides a more solid backing. For this reason alone it is good to tell us that you are framing a Diamond painting.
If you are going to fold your edges over the backboard you can allow a couple of extra mm when measuring.
Just ask us if you have any questions as it is much better to get measurements right rather than getting a frame that is not right.
Frame Styles
^ Frame Styles:
 The default frame style we offer is called PF7. It currently comes in Matte Black, Shiny Black, White, Matte Silver, Shiny Silver, Matte Gold, Shiny Gold, Pewter, Brunswick Green and Wedgewood Blue. PF7 is a high quality everyday frame and accounts for 95% of all the frames we make. Prices vary a little depending on colour, with matte black being the best value as it is so popular.